Mac Connected to Wi-Fi but No Internet? How to Fix It
Your Mac shows a Wi-Fi connection, yet websites won't load. Walk through DNS, proxy settings, and other common causes step by step.
Your Mac can be connected to Wi-Fi while still having no internet access: the wireless link works, but another layer such as IP configuration, DNS, proxy/VPN routing, or the upstream connection is failing.
The Wi-Fi icon in your Mac’s menu bar shows a solid connection. You open Safari or Chrome, type a URL, and the page spins. After a while you get a message about the server not responding.
You check iMessage or Slack — messages are going through. Other devices on the same network load pages fine. The Wi-Fi signal is strong, but your browser refuses to cooperate.
A Wi-Fi connection confirms that your Mac can reach the access point. Web browsing also depends on a valid IP configuration, DNS, proxy and VPN routing, and an internet path beyond the router. The checks below isolate those layers in a practical order.
Quick diagnosis: Mac connected to Wi-Fi but no internet
| What you see | Likely area to check |
|---|---|
| Wi-Fi connected, no apps work, other devices also have no internet | Router or ISP issue |
| Wi-Fi connected, other devices work, only this Mac fails | Mac-specific settings |
| Messaging apps work but browser pages won’t load | DNS or proxy configuration |
| Pages work in one browser but not another | Browser-level issue (extensions, cache, profiles) |
| Everything worked before visiting a new network or disconnecting a VPN | Stale proxy or VPN state |
| Public network: shows a Wi-Fi connection but no internet | Captive portal not completed |
This table is a starting direction, not a complete diagnosis. The steps below go through each possibility in a practical order.
Follow the branch that matches your symptom
Rather than running every step in order, start from what you observe:
- Every device on the network fails — the network itself is the problem. Restart the router or modem, then contact your ISP if nothing changes. Your Mac’s settings are not the cause, so the Mac-only steps below will not help.
- Only this Mac fails while other devices work — the problem is in this Mac’s configuration. Work through the steps below: DHCP lease, DNS, proxy, then VPN and security software.
- Only browsers fail while messaging and other apps work — DNS or proxy is the most likely cause. Check DNS first, then proxy settings.
- Only one app or service fails — the problem is usually specific to that app or service (its own servers, account state, or a firewall rule), not the network path.
- You are on a public Wi-Fi network — start with the captive portal check. Public networks often hide their login page behind a redirect that browsers do not always follow automatically.
- The problem started after a VPN disconnect or a settings change — check proxy and VPN state first; leftover proxy configuration is one of the most common causes.
Each step below also says what result rules it out, so you can stop as soon as you have a direction.
A quick story: messaging worked, web didn’t
Not long ago I was working from a coffee shop. My Mac joined the public Wi-Fi without any problem — the signal was strong and the menu bar icon showed a solid connection. I kept chatting in a messaging app without interruptions; messages sent and arrived normally.
Then I tried to open a documentation page in my browser. Nothing. The page timed out. I tried a few other sites — same result.
I had just started working on WiFi Lens’s Network Self-Check feature. It was still an early version — limited in scope and far from polished — but it already checked basic network state, DNS resolution, and system proxy configuration. I ran it, and the results pointed clearly at DNS. The Mac was configured with a specific DNS server (223.5.5.5) that happened to be unreachable from that coffee shop’s network. Adding a different, reachable DNS server brought the browser back immediately.
The messaging app had kept working because it maintained its own persistent connection to the server, established before the session started. Web pages, which begin with a fresh DNS resolution each time you visit a new site, were blocked before they could even start loading.
This experience is not a universal rule — sometimes the issue is a proxy, a VPN, or something else entirely. But it illustrates why “connected to Wi-Fi” and “internet works” are not the same status.
Connected to Wi-Fi is not the same as connected to the internet
The Wi-Fi icon in macOS reports one thing: your device has established a wireless link with an access point or router. That is the first layer. Whether you can actually browse the web depends on several other layers working together.
What needs to be working for a web page to load:
- Your Mac has a valid IP address from DHCP
- The router or gateway can reach the internet
- DNS can translate domain names to IP addresses
- System proxy settings, if configured, point to a working proxy
- VPN and security software are not blocking connections
- For public networks, the captive portal login page has been completed
- Individual browsers can have their own issues independent of system settings
Each of these can fail while the Wi-Fi icon still shows a connection. The key is figuring out which layer has the problem.
Step-by-step troubleshooting
Step 1: Confirm the scope
Start by understanding how widespread the problem is. Try a few different sites — one failing site could be a server problem, not yours. Switch to a different browser on the same Mac. If Firefox or Chrome works but Safari does not, the issue is likely browser-specific.
Check whether non-browser apps can reach the internet. Open the App Store, check for software updates in System Settings, or use a native app like Apple News. If system-level services work but browsers don’t, the problem is more likely in DNS resolution or proxy handling that affects browser-initiated connections differently.
If you can, try another device on the same Wi-Fi network — a phone, a tablet, another laptop. If every device has the same problem, the issue is with the network itself, not your Mac.
Then try switching to your phone’s personal hotspot. If everything works on a different connection, the problem follows the original network, not your Mac.
Step 2: Check for a captive portal
Coffee shops, hotels, airports, and many public Wi-Fi networks require you to accept terms or log in through a web page before allowing internet access. Sometimes this page doesn’t appear automatically.
Open Safari and try to load any website. If a login or acceptance page appears, complete the process. If it does not appear automatically, type captive.apple.com in the address bar — this is Apple’s captive portal detection URL. Loading it often triggers the login page.
You can also turn Wi-Fi off and on again, or choose Forget This Network and reconnect. This forces a fresh association that may present the portal page.
Step 3: Quick macOS network checks
Before diving into DNS or proxy settings, run through a few basic checks:
Check the date and time. Go to System Settings > General > Date & Time and make sure Set date and time automatically is turned on. Incorrect time can break HTTPS connections, and the result looks identical to a network problem.
Turn Wi-Fi off and on. Click the Wi-Fi icon in the menu bar and turn Wi-Fi off, wait a few seconds, then turn it back on. This forces a fresh DHCP request, which usually gives you a renewed IP address.
Restart your Mac. It is the cliché troubleshooting step because it genuinely resolves many transient issues. If you are in the middle of work and want a faster option, try switching to a different network (like your phone hotspot) first.
Try the router. If other devices on the same network are also affected, restarting the router or modem may help. Power it off, wait 30 seconds, and power it back on.
Step 4: Renew the DHCP lease and verify the gateway
Before touching DNS or proxy settings, confirm that your Mac has a valid IP address and can reach its router. Your Mac receives its IP address, router address, and DNS servers from the network through DHCP. A stale or broken lease produces the same symptom — connected to Wi-Fi, but no internet.
How to check the lease on a Mac:
- Open System Settings
- Go to Network
- Select Wi-Fi, then click Details
- Select TCP/IP
You will see the IP address, the Router (gateway) address, and the subnet mask. If the IP address starts with 169.254, your Mac could not get an address from the network — the lease is the problem.
What to do:
- Click Renew DHCP Lease and wait a few seconds. This asks the network for a fresh IP address without touching anything else.
- Turn Wi-Fi off and on if renewal does not help; that forces a new association and a new DHCP request.
Optional terminal check: ipconfig getpacket en0 prints the DHCP reply your Mac received — the IP address, router, and DNS servers the network actually assigned. If it fails or shows no router, the network is not providing a working configuration.
Verify the gateway: find the Router address on the TCP/IP screen, then ping it:
ping -c 3 192.168.1.1Use the Router address shown on your Mac instead of the example address.
- Ping to the router works but web pages still fail — the wireless link is fine; the problem is above the router: DNS, proxy, or the network’s own internet connection. Move on to Step 5.
- Ping to the router fails — the problem is the wireless link itself, not DNS or proxies. Restart the router, move closer to it, or try a different band before continuing.
When this step does not apply: if every device on the network is affected, renewing this Mac’s lease will not help — the network or router is the source. On a managed Mac, an unusual-looking IP address may be intentional (static assignment or corporate addressing); check with your IT team before changing anything.
Step 5: Check DNS settings
DNS — the Domain Name System — translates domain names like example.com into IP addresses that your computer can connect to. If DNS resolution fails, your browser cannot even begin to load a page, even though your Wi-Fi connection is perfectly healthy.
This is why messaging apps sometimes keep working when browsers don’t. Many messaging apps maintain persistent connections that were established earlier — they do not need to resolve DNS again for each message. But every time you visit a new website, the browser must resolve the domain first, and a DNS failure stops the entire process before it starts.
How to check DNS settings on a Mac:
- Open System Settings
- Go to Network
- Select Wi-Fi, then click Details
- Select DNS
You will see a list of DNS servers. By default this list is empty or shows automatically assigned servers from your network. If servers are listed, check whether they make sense for your current network.
If you changed DNS servers for a previous network (your home network, or for privacy reasons), those same servers may not be reachable from your current location — the coffee shop example earlier is exactly this case.
What to do:
- Write down the current DNS servers before making changes, so you can restore them later
- If in doubt, remove manually added servers and let macOS use automatic DNS (the servers assigned by the current network)
- If you want to try an alternative DNS provider, ensure the servers you add are reachable
If you are in a managed environment (corporate, school, or enterprise network), DNS may be required for internal resources. Do not remove corporate-assigned DNS without checking with your IT team.
Optional terminal check: Open Terminal and type nslookup example.com. If the command returns an address, DNS is working at a basic level and is not the cause — the problem is elsewhere (proxy, VPN, or the network’s connection). If it times out or returns an error, DNS is a strong suspect.
Step 6: Check system proxy settings
System proxy settings on macOS can override normal internet access, and they are one of the most common reasons a Mac shows connected Wi-Fi but cannot load web pages. Proxy settings often stick around after a VPN or proxy application is used and can silently break internet access when they point to a server that is no longer available.
What macOS proxy settings exist:
- Auto Proxy Discovery — macOS tries to find a proxy configuration automatically on the network
- Automatic Proxy Configuration (PAC) — a URL points to a script that tells macOS when and how to use a proxy
- Web Proxy (HTTP)
- Secure Web Proxy (HTTPS)
- SOCKS Proxy
A proxy — whether HTTP, HTTPS, or SOCKS — acts as an intermediary between your Mac and the internet. When configured, your web traffic is sent through it. If the proxy server is offline, unreachable, or on a port that no longer accepts connections, web pages will not load.
Proxy and VPN are not the same thing, but they often overlap. A VPN may configure system proxy settings, and when the VPN disconnects or the application exits abnormally, the proxy settings can remain active.
How to check proxy settings on a Mac:
- Open System Settings
- Go to Network
- Select Wi-Fi, then click Details
- Select Proxies
You will see a list of protocols with checkboxes. If any are checked and you did not configure them intentionally for your current network, that is likely the cause.
What to do:
- Write down the current proxy configuration before making changes
- Temporarily uncheck any proxy settings you did not set for the current network
- If the issue goes away, a stale proxy was the cause — you can now investigate which app left it behind
If you are on a corporate or managed Mac, proxy settings may be required by your organization. Do not remove proxies without checking with your IT team.
Optional terminal check: The scutil --proxy command shows the current proxy configuration in a compact summary. It is useful for double-checking what is active, but it is not necessary for the basic check above. If the output shows no proxies enabled — HTTPEnable, HTTPSEnable, and SOCKSEnable all false, with no PAC file — a proxy is not the cause, so move on to VPN and security software.
Step 7: Temporarily check VPN and security software
VPN clients, firewall software, and network filters can affect internet access in ways that are not obvious from the Wi-Fi icon. If you use any of these, try the following:
- Disconnect or quit the VPN client entirely — not just toggle it off in the menu bar
- Temporarily disable any third-party firewall or network security software
- Check whether the problem goes away
If it does, you have identified the cause. Re-enable the software and check its configuration, or contact its support for guidance on the specific setting blocking your connection.
For devices managed by an employer or school, do not disable security software permanently. Use the temporary check only to identify the cause, then contact your IT team with the information.
Step 8: Use Apple Wireless Diagnostics
macOS includes Wireless Diagnostics, a built-in tool for analyzing Wi-Fi issues. To access it:
- Hold the Option (⌥) key
- Click the Wi-Fi icon in the menu bar
- Select Open Wireless Diagnostics
- Follow the on-screen instructions
The tool runs through a series of checks on the Wi-Fi connection, signal quality, and network configuration. It can generate a diagnostic report that you can share with a network administrator or support team.
Apple Wireless Diagnostics gives general information about your Wi-Fi connection, but it does not go deep into DNS resolution, proxy configuration, or individual application behavior. It is a useful starting point, not a complete diagnostic tool.
Step 9: Use WiFi Lens Network Self-Check
If the steps above have not identified the problem — or if you want a faster way to narrow things down — WiFi Lens Network Self-Check can inspect several critical areas in one place.
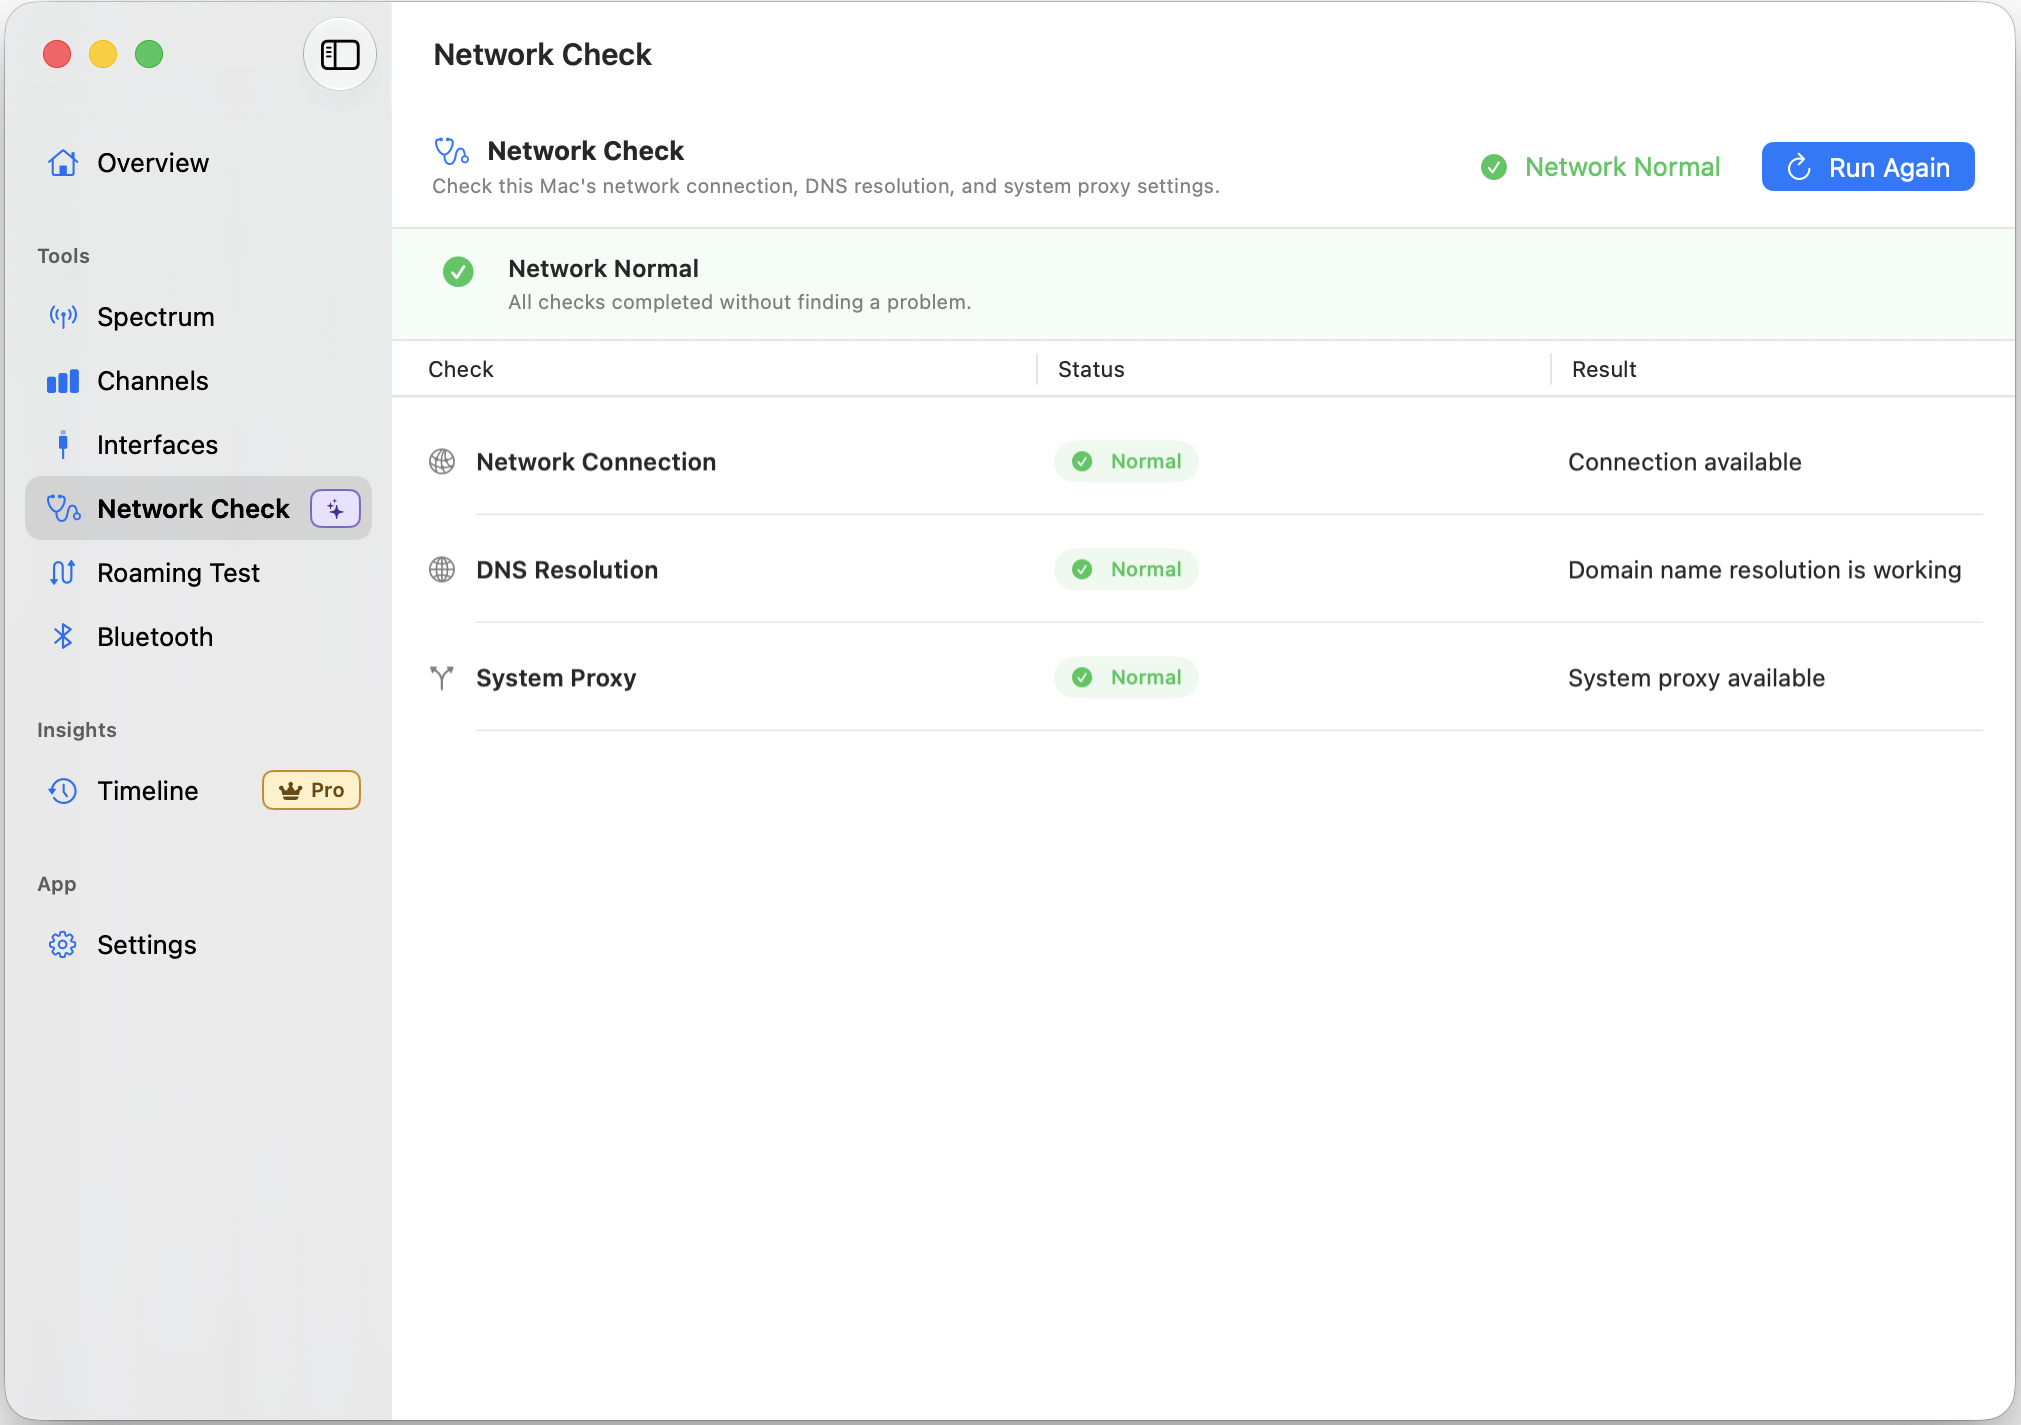
Network Self-Check is a feature in WiFi Lens that examines your current network state from multiple angles and presents the results together. It does not fix anything automatically, and it does not claim to find every possible issue. But it can tell you where to look first.
Since version 1.5.1, Network Self-Check is organized as a three-stage pipeline — This Mac, LAN, and Internet — with results grouped into a workbench. You can see at a glance which stage holds the problem instead of reading a flat list of checks.
What Network Self-Check checks in 1.5.1:
- This Mac — whether the macOS network path is active, whether DNS can complete a test domain resolution, and the system proxy configuration (HTTP, HTTPS, SOCKS, PAC, and auto proxy discovery)
- This Mac — whether a configured proxy routes through a virtual network interface such as a VPN or TUN device. This is a common cause of broken browsing after a VPN session
- LAN — whether your Mac can reach its gateway
- Internet — whether the Mac can reach the internet, using Apple’s authoritative captive-portal probe
- Additional checks — IPv6 access, plus evidence-based next steps when something is abnormal
The workbench also flags when a captive portal may be intercepting web access, so you know to look for a sign-in page rather than DNS or proxy settings.
The results help distinguish between a DNS problem, a proxy problem, or a more fundamental network path issue, so you do not waste time restarting devices or changing settings at random.
Availability: Network Self-Check is available to all users — both the open-source edition and the Pro version. No purchase is required to use it.
How it works and privacy:
WiFi Lens does not collect or upload your network diagnostic data. Network Self-Check runs entirely on your Mac, and its results remain local.
When checking DNS, the tool performs a single test domain resolution. When testing configured HTTP, HTTPS, or SOCKS proxies, it only checks whether the host and port accept a TCP connection. WiFi Lens does not read, save, or upload proxy credentials, and it does not send HTTP test requests through the proxy. For internet connectivity, it loads Apple’s captive-portal detection endpoint (captive.apple.com) and a stable HTTPS page to tell a working connection apart from one that is being intercepted.
DNS resolution and TCP reachability tests do generate network traffic by design — the tool cannot check connectivity without sending packets. No diagnostic data leaves your device beyond these necessary connection checks.
What Network Self-Check does not do:
- It does not automatically change DNS or proxy settings
- It does not fully evaluate PAC scripts
- It does not manage VPN connections or tunnels — it only reports when a proxy route goes through a virtual interface
- It does not complete captive-portal sign-in for you — it flags that sign-in may be required
- It does not analyze DNS poisoning or hijacking
- It does not check DNS-over-HTTPS (DoH) or DNS-over-TLS (DoT) configuration
- It flags certificate time errors but does not validate full TLS certificate chains
- It reports whether IPv6 access works but does not manage IPv6 configuration
- It does not track DHCP lease state
These limits are intentional. Network Self-Check is a starting point for narrowing down why web pages will not load, not a replacement for complete network diagnostics.
macOS settings that produce the same symptom
Everything above is about the network. These are macOS-side settings that produce an identical symptom — the Wi-Fi link is up, every other device on the network works, and this Mac still cannot browse. They are worth ruling out before you conclude the problem is the router or your ISP, because each one is quick to test and easy to undo.
iCloud Private Relay
The signature: Safari fails to load pages while other apps keep working, often on a public, hotel, or corporate network that worked for you before.
Private Relay sends browsing traffic through two relays instead of directly to the site. If the network blocks those relay endpoints, or the relay cannot be reached, browsing fails even though the local link, the IP configuration, and DNS are all fine. Because it applies to browsing and to some DNS lookups rather than to every connection, ping can succeed while every page fails — which is why this cause is easy to misdiagnose as a DNS problem.
Test it: turn Private Relay off, then load a page again. If it loads, the relay path was the problem.
Turn it back on afterward if you want the privacy it provides — on a network that blocks it, you may need to leave it off while you are connected there.
Private Wi-Fi Address
The signature: connected to Wi-Fi with no internet on one specific network — often a hotel, campus, conference, or office network — while every other network works normally.
macOS presents a per-network random MAC address by default instead of your Mac’s hardware address. Networks that filter by MAC address, or that hold a DHCP reservation keyed to the original hardware address, will refuse to hand out a working lease. Your Mac associates with the access point, so the Wi-Fi icon looks fine, but it never receives a usable IP configuration.
Test it: set Private Wi-Fi Address to Off for that network, then rejoin it.
The setting is per-network, so this affects only the network you change. It reduces privacy on that network only. On a managed network, check with IT before changing it — MAC filtering is sometimes a deliberate access control.
Date and time out of sync
The signature: browsers report certificate or connection errors, on every site, while ping and DNS lookups still work.
HTTPS connections are validated against your Mac’s clock. If the date or time is off far enough, certificates look either expired or not yet valid, and every secure connection fails — which reads as “no internet” in the browser even though the network is fine.
Test it: open System Settings > General > Date & Time and turn on Set time and date automatically. From the terminal, sudo sntp -sS time.apple.com sets it directly.
A clock that keeps drifting back points at the battery or the logic board rather than the network, and is worth fixing on its own.
MTU mismatch
The signature: small pages load and large ones stall partway. Ping works, DNS works, and the connection looks fine until a page has to move real data.
Every link has a maximum transmission unit. When a path in the middle — a VPN tunnel, a PPPoE connection, or a misconfigured router — can carry less than your Mac assumes, large packets are dropped silently. Small requests succeed, which is what makes this one look like an intermittent fault.
Test it: run ping -D -s 1472 8.8.8.8. The -D flag forbids fragmentation, and 1472 bytes plus headers is a full 1500-byte packet. If that fails while ping -D -s 1400 8.8.8.8 succeeds, the path cannot carry a full-size packet.
This one is most likely if the symptom started right after you installed or connected a VPN, since the tunnel is often the narrowest link.
When to look beyond your Mac
If you have gone through all the steps and the problem affects every device on the network, the network itself (router, ISP, or physical connection) is the most likely source. In that case the router may need a restart, or you may need to contact your ISP. If the problem follows a specific location — your home office but not the living room, or a specific cafe but not others — the issue is specific to that location’s network.
Apple’s internet-over-Wi-Fi troubleshooting guide also covers macOS updates, router checks, network recommendations, and ISP-side problems.
Frequently asked questions
Why does my Mac say it is connected to Wi-Fi but have no internet? The Wi-Fi icon only shows that the wireless link between your Mac and the router is active. Whether you can reach the internet depends on additional layers — IP configuration, DNS, proxy settings, VPN state, and the network’s own internet connection. Any of these can fail while the wireless link stays up.
Can DNS fail while messaging apps still work? Yes. Many messaging apps establish a persistent connection when they start and keep it open. If DNS resolution fails, new connections like a browser loading a new domain cannot begin, but existing connections continue to work. This is a common pattern when DNS is the problem.
How do I check proxy settings on a Mac? Open System Settings > Network > Wi-Fi > Details > Proxies. You will see all configured proxy types — HTTP, HTTPS, SOCKS, PAC, and automatic discovery. Write down what is configured before making any changes, so you can restore it if needed.
Does WiFi Lens change my network settings? No. WiFi Lens reads network information for display and analysis. Network Self-Check runs diagnostic checks and reports the results, but it does not modify any system network settings on your Mac.
Is Network Self-Check available in the open-source edition? Yes. Network Self-Check is included in the open-source edition and does not require a Pro license.
Why does my Mac say connected to Wi-Fi but have no internet on only one network? A single-network failure usually points at something specific to that network or to how your Mac identifies itself there. The two most common causes are a captive portal you have not completed, and MAC-based filtering or a DHCP reservation that does not recognise your Mac's current private Wi-Fi address. Check the portal first, then try turning Private Wi-Fi Address off for that one network.
Can a wrong date and time cause no internet on a Mac?
Yes. HTTPS connections are validated against the system clock, so a clock that is off by enough makes every secure connection fail even though the network is working. If pages report certificate or connection errors while ping succeeds, check System Settings > General > Date & Time before you look at the router.
Does iCloud Private Relay cause Wi-Fi connected but no internet? It can. Private Relay routes browsing traffic through relays, and a network that blocks those endpoints will leave you connected with nothing loading. Because it affects browsing and some DNS lookups rather than every connection, apps with their own persistent connections may keep working — which is the pattern that makes it look like a DNS failure. Turning Private Relay off temporarily is the quickest way to rule it out.
Where to go from here
If you are trying to diagnose why your Mac cannot load web pages, start with the scope check in Step 1 and work through the steps above. In many cases the issue is a mismatched DNS server or a leftover proxy setting from a VPN or proxy application.
WiFi Lens Network Self-Check can help narrow down that search quickly. It will not fix every network problem, but it can point you in the right direction before you start changing settings at random.
Related reading: Wi-Fi Slow in One Room? Don’t Replace Your Router Yet separates coverage problems from congestion when connections work but stay slow in specific rooms.
If browsing stopped after you disconnected a VPN, see Mac Internet Stops After a VPN Disconnect? Check the System Proxy for a focused proxy and VPN check.
To see what WiFi Lens shows about your own network, start with the feature overview or check the comparison with other Wi-Fi tools. If you are unsure whether you need Wi-Fi analysis, packet capture, port scanning, or traffic monitoring, the Network Analyzer for Mac guide separates those tool categories. You can also download WiFi Lens and run the checks yourself.
- Download WiFi Lens from the Mac App Store
- View the open-source code on GitHub
- Encountered a network problem or have feedback? Open an issue